|
I have had a few people ask about the bed so here's what I have at the moment. I may rebuild the frame, but it works for now, and if nothing else it will provide a good template for whatever I decide to do in the future. There are a number of reasons this is a complicated design. You have the usual factor of dealing with the van walls being not square nor flat. Along with that, you are not supposed to have anything spanning the entire width of the van and attached to both walls at the same time. This is because of torsion and flex in the van as you drive. In order to meet a few of my build goals I had to design for the bed to utilize the space from the flares as well as allow for use of the bench seat.
Below is the design I came up with. There are a few more East-West supports than pictured. Keep in mind that they are attached, but only on one side (alternating sides with each East-West support). They are on top of the North-South supports. The space the flares created is illustrated as the sections on the outside of the North-South supports. 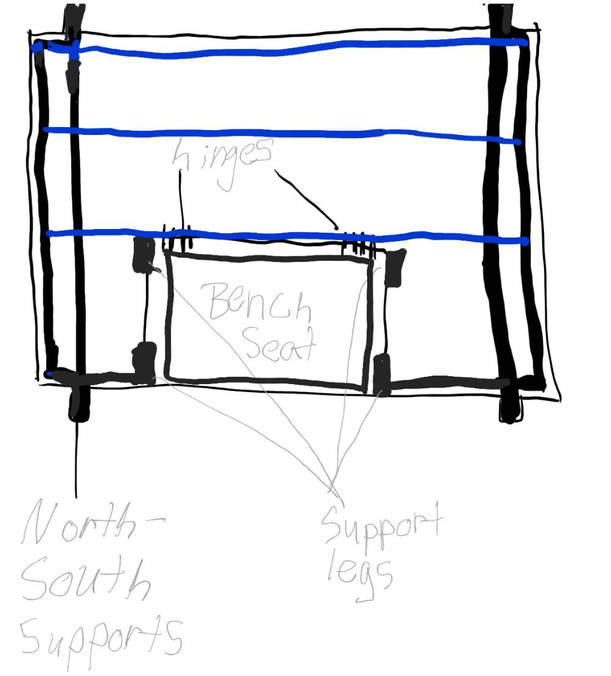
In its current state, my bed frame is just 2x4s with particle board on top. It functions, seems sturdy enough, and doesn't make much noise when I am driving. The only problem is the support legs. They are potentially in the way of storage options I may want to implement in the near future. A solution to this maybe to have part or all of the frame fabricated in metal, which should get rid of the need of at least some of, if not all of the support legs.
The hinged section is there to give headroom when I have passengers sitting in the seat which is located underneath the northern most edge of the bed frame. I do not yet have a plan to hold up that hinged section. I have not finished the ceiling and cabinets yet and so I don't know where I would attach anything. But I am thinking that rather then attaching a support for it on one of the cabinets, walls or ceiling, I will probably figure out a 45 degree prop to hold it up that will rest where the hinged part rests when the hinged part is down. Here is all I have as far as media on the bed at the moment:
I decided those metal L brackets are worthless because they bend. To support this section of the bed I ended up having a 2x4 that each side of the hinged part can rest on, supported by the leg supports.
What about the mattress?
Another goal for my build was to have a queen size bed that was just as comfortable as my bed at home. In fact I used the mattress that I have been using at home for the past 2. It is an 8 inch memory foam. I like a firm mattress and its not as firm as it could be, but it is supportive to the extent that you don't just sink in to your own indent. It has a layer of firmer foam that I had used in our house as the bottom, but I think its actually meant to be the top layer. My only concern is that I feel like the mattress was starting to wear in a little, creating a dip in the center, but since I flipped it over to have the firmer layer on top this doesn't seem to be an issue yet; time will tell. If your bed frame has slat supports, you will want boards over the slats, otherwise this mattress will sink in the gaps. I have not cut out the hinged of the mattress just yet, but I will make an update when I do so. Here is my mattress. Compromising between comfort, weight/thickness/size and price ($230) I do recommend it:

0 Comments
The scenario:
You're listening to some sweet tunes pumped through your van's stereo system while having a few beers with friends by the fire. You've had a great night and it's 2am before you know it. You put out the fire and turn your ignition off (like the responsible adult you are) before you "PTFO." Everything was going swimmingly until you set out for the trail the next day and your trusty van won't start. Here is how I plan to avoid this situation:

Do electrical work at your own risk! I am not a professional. If you see anything wrong with what I am doing I would love to hear from you. This being said, I have not had a problem (otherwise I would not be sharing)-so hopefully it's all gravy baby!
Its simple really, you program the time, and weather you would like it to cut the connection or complete the connection during said time. I have it set for 2 hours and to complete the connection during those two hours (disconnecting afterwards). The timer needs a positive and negative power supply to operate itself. This can be a different source than the power you would like to supply to the source (in this case the stereo) but it doesn't need to be. I added a switch inline to the timer so that I can control when to turn it on and off. You can run the negative directly into the source, bypassing the timer. For the positive supply, you run it in, then out of the timer and to the source. I use my house batteries to power the source so I just spliced right into the positive and negative on the wiring harness on the stereo, leaving the ignition from the van also connected. As far as I can tell there is nothing wrong with doing it this way. The van/alternator powers the stereo as I drive, and if I want to listen to music while parked I flip the switch on the timer. I hope to make DeVANdra practical, unique, stylish and innovative. Maybe my build will inspire others. Here is a list of what I would like to accomplish:
|
 RSS Feed
